Line Item Setup - Delivery Section Walkthrough
Print
Created by: Laura Bowen
Modified on: Mon, 7 Sep, 2020 at 6:59 PM
In this video we will take you through the delivery section of your line item setup. You will also find a written summary below.
You can jump to the walkthrough of the next section of your line item setup (Location) by clicking here.
Delivery Section Walkthrough written summary
The first concertina section of your line item set up is Delivery.
Here you will input the amount of budget you want to assign to this specific line item. As you set up your line items, their budgets are added together to form your overall campaign budget which you will see at the top.
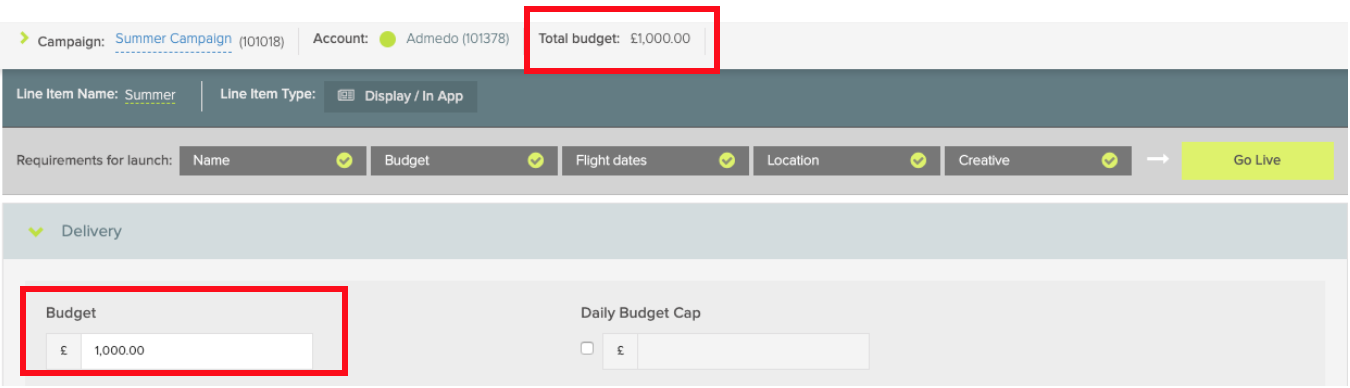
Once you have input this, if the ‘Budget’ Tile above the delivery section does not have a tick against it, this means there is not enough credit applied to your account to allocate to this.

Please contact your account manager or submit a ticket to request additional credit


We would recommend a minimum overall campaign budget of £5,000 for a performance-based campaign to ensure you have enough data to really benefit from the system’s machine learning and auto optimisation engine.
You can also add a daily budget cap here to restrict your spend if that is required at any point. Remember that this is a cap rather than a spending goal. If your daily run rate based on your overall budget set, is less than the amount you add as a cap, it will not be able to reach this.

Next under the strategy title you can select the pacing for your campaign spend, even or asap. Even will spend your budget evenly across the flight days of your campaign assuming it is not restricted by your targeting selections. Asap will spend your budget as quickly as possible.

Asap pacing can be useful to give priority to line items in the campaign with tight targeting that are struggling to deliver, but we would recommend you also apply a daily budget cap and monitor this carefully. There is a safety catch confirmation when selecting asap pacing to try to avoid mistakes.
We always recommend you start your line item with even pacing, as asap can spend your entire budget in a few minutes if the setup is unrestrictive.
Next you will select your bid type and Optimisation Strategy. You can choose from a Max CPM Bid (cost per 1000 impressions), an eCPC Target (average cost per click) or an eCPA Target (average cost per action).

Combine this with your optimisation choice of CTR to maximise Clicks, Margin to simply deliver your budget cost effectively but with no performance goals attached, or CVR to maximise conversions. Note that you cannot select conversion rate optimisation until you have a conversion tracker added to your line item.
We recommend starting with a Max CPM bid with CTR optimisation - if your goal is conversions, you can then switch to conversion rate optimisation once you have some conversion performance data flowing through your line item. Setting this to conversion rate optimisation before then can cause your line item to adopt erratic buying patterns while it looks for performance.
Within the Video line item workflow, you will find one more optimisation Type available here for Completed Video Views. If you are setting up a Video Line item, we would recommend you start with a Max CPM Bid and Completed Views Optimisation.

Once you have consistent performance, you can also try testing the eCPC or eCPA Bid Types but we do often find that Max CPM with the relevant optimisation strategy will out-perform these. Again, you may notice your buying patterns change if you switch to these Bid Types, but this should settle assuming the goals are achievable.
Next select the Time-zone for your line item to run in, this will ensure that the start and end times set are correct for your selection. Note that this has no bearing over your reporting which is all set in UTC (Coordinated Universal Time).

Then you can select your start and end dates, again we would recommend a minimum of 4 weeks for a performance-based campaign, for optimisation purposes.

Next add a user frequency cap for the maximum number of impressions you want to show per user over a selected time period for the ads attached to this line item. We would recommend starting with 1-3 per day for prospecting lines and 6 upwards per day for retargeting. You can test other frequencies once you have some benchmark data.

Finally, if you need to restrict your delivery to any specific times of the day or days of the week you can toggle open the Dayparting feature to select these. Choose from the list of pre-sets in the dropdown menu

or simply click on the row or column titles or the individual day blocks themselves to turn them on or off. The green blocks denote when your line item will be active. Consider your use of this carefully if it’s for performance optimisation - as for example - just because you don’t see conversions happening over the weekend, doesn’t mean that those impressions are not having an impact on the users who are converting during the week.

That’s the Delivery section of your line item setup complete, you can close this to see the summary of your settings.
You can jump to the walkthrough of the next section of your line item setup (Location) by clicking here.
Laura is the author of this solution article.
Did you find it helpful?
Yes
No
Send feedback Sorry we couldn't be helpful. Help us improve this article with your feedback.